Sea Glass Soap Bars: Translucent Melt-and-Pour Layers
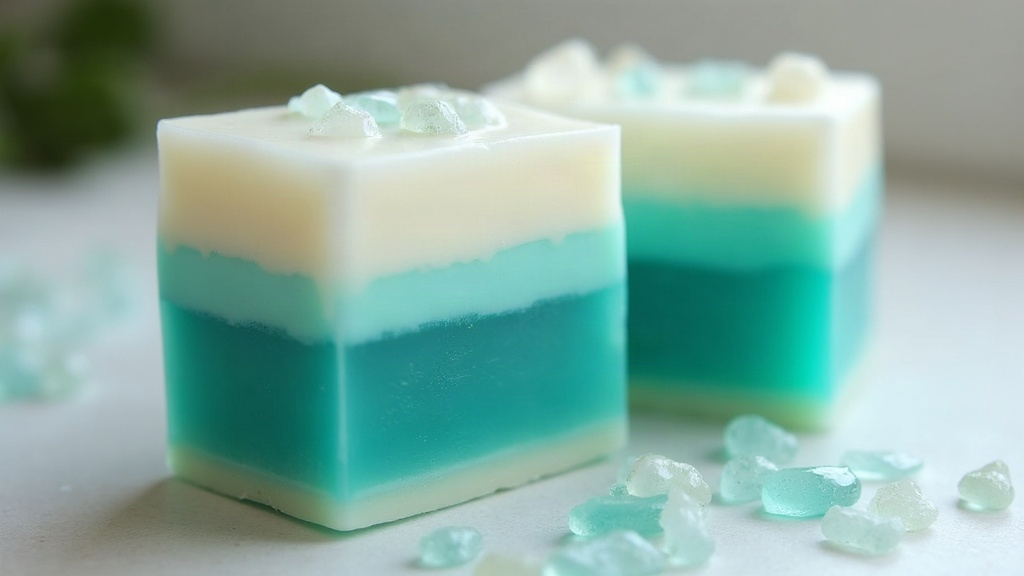
Sea glass soap bars copy that frosted, ocean-tumbled look of real beach glass, using translucent melt-and-pour layers stacked in blues, greens, and aquas. The trick lies in clear glycerin base, careful color layering, and a handful of texturing tricks that give you that soft, worn glow real sea glass has after years in saltwater. Here’s a full walkthrough: supplies, color mixing, pour order, and the fixes for when things go sideways, so your bars end up looking like little chunks of ocean treasure instead of plain colored soap.
Why Sea Glass Soap Works So Well with Melt-and-Pour
Melt-and-pour (MP) soap base is close to perfect for this project, and here’s why:
- Clear base is naturally translucent, so it catches light the same way real sea glass does.
- Layers set fast, which means you can build depth in an afternoon instead of waiting hours between pours.
- Color is easy to dial in, since MP takes liquid dyes and mica without clumping or streaking.
Unlike cold-process soap, melt-and-pour skips the lye handling at the crafting stage. That alone makes it a solid starting point for beginners who still want something that looks like it came from a proper soap studio.
Supplies You’ll Need
- Clear glycerin melt-and-pour base (skip the white/opaque base here, it kills the translucency you’re after)
- Liquid soap dyes in ocean shades: aqua, teal, cobalt, sea green
- A touch of white opaque base or titanium dioxide for that frosted “beach glass” cloudiness
- Rubbing alcohol in a spray bottle (stops bubbles, helps layers bond to each other)
- Silicone loaf mold or individual cavity molds
- Heat-safe measuring cups or a double boiler
- Optional: soap-safe mica for a whisper of shimmer, sea salt or a textured mat for surface effect
Step-by-Step: Building the Layers
1. Melt in Small Batches
Cut your clear base into cubes and melt gently, 20-30 second bursts in the microwave, or a double boiler if you want to avoid scorching entirely. Working one color at a time, in small batches, gives you way more control over timing than trying to juggle four colors at once.
2. Mix Your “Glass” Colors
Go for muted, slightly cloudy tones here rather than bright, saturated colors. Think bottle glass left on a beach for a decade, not a crayon box.
- Aqua layer: 2-3 drops blue + 1 drop green dye
- Sea green layer: 3 drops green + a tiny bit of white opaque base
- Cobalt layer: 2 drops blue dye only, kept fully clear
- Frosted white: a small amount of titanium dioxide stirred into clear base for that cloudy, weathered look
Pour each color into its own cup so you’re not scrambling once the base starts to firm up.
3. Pour Thin Layers, Not Thick Ones
Real sea glass is thin, almost paper-like in places, and that’s part of what makes it catch light. Keep each layer to about 1/4 to 1/3 inch. Let it firm up to tacky (not rock hard) before pouring the next one. Skip this step and your layers will pop apart later like a cracked Jenga tower.
4. Spritz Between Every Pour
Once a layer has set just enough to hold the next pour, give it a light spritz of rubbing alcohol. This knocks out surface bubbles and gives the next layer something to grab onto, instead of sliding off the second you slice into the bar.
5. Angle the Mold for a Wave Effect
Want a more organic, wave-like transition between colors instead of flat stripes? Prop one edge of the mold up about 10-15 degrees while a layer sets, then level it back out for the next pour. You’ll get soft diagonal color breaks that read as more natural, more “tumbled by waves” than ruler-straight lines ever do.
Getting the Frosted, Tumbled Look
Real sea glass has that matte, sanded texture from years rolling around in saltwater and sand. A few tricks get you close:
- Spritz the top of the mold lightly with rubbing alcohol right before unmolding, then let it air-dry instead of wiping it. That softens the shine on its own.
- Once the bar’s cooled, rub the surface gently with a clean, dry cloth to take the glossy edge off.
- Hold off on high-shine mica for the outer layers. Save any shimmer for the inside, where it peeks through just faintly rather than announcing itself.
Common Problems and Fixes
- Layers separate when you cut the bar: your base cooled too much before the next pour went in. Pour while it’s still slightly warm, and don’t skip the alcohol spritz.
- Soap looks cloudy everywhere, not just where you wanted it: base got overheated or stirred too hard, trapping air in it. Stir gently and keep your pour temp around 125-130°F.
- Colors come out muddy instead of glassy: you used too much dye, plain and simple. Add color one drop at a time. Translucent soap needs a fraction of the pigment that opaque soap does.
Finishing Touches
Once bars are fully cooled and out of the mold, run a warm knife along the edges for soft, rounded corners, the kind you’d expect on glass that’s been tumbled by waves for years. Wrap the finished bars in clear cellophane or kraft paper so the translucent layers show through. Honestly, this last step is often what sells the sea glass illusion before anyone even picks the bar up.
Conclusion
Sea glass soap bars make for a satisfying melt-and-pour project. Thin layers, muted ocean tones, and a light alcohol spritz between pours, that’s really the whole trick, and it adds up to a finish that genuinely catches light like the real thing. Get the pour timing and color intensity down after a batch or two, and you’ll be turning out bars that look like they washed straight up onto your kitchen counter from the shoreline.